Monday, December 27, 2010

My Nifty Fifty

In previous posts where I've mentioned Depth of Field (or Depth of Focus), I'm sure I've bemoaned the lack of aperture in my standard kit lenses?  Well now I have my 'Nifty Fifty' with an additional 3 f-stops (taking me from f/5.6 at 55mm on my 18-55 zoom, to f/1.8 on the 50mm), so there is more opportunity for bigger and better things, DOF-wise... (and bokeh, and hand-held low-light shots, etc.)

So what is a 'Nifty Fifty'?
Basically, it's a 'prime' lens with a fixed focal length of 50mm.  Prime lenses have a fixed focal length such as 50mm, as opposed to zoom lenses, that have variable focal lengths, such as 18-55mm.  Prime lenses usually have better maximum aperture than the equivalent focal-length on a zoom lens.

And why is it 50mm?
Well, when combined with a full frame dSLR or a 35mm film SLR, the 50mm lens approximates the field of view of the human eye.  This made the 50mm lens a very popular choice in the pre-digital days.  Now, with entry level dSLR cameras having sensors that are smaller than a 35mm film negative, the size difference impacts on the 'effective' focal-length of the lens.  This size difference gives an adjustment factor of around 1.5 to 1.6, which makes the 50mm lens behave approximately the same as a 75mm lens on a 35mm film SLR.  This is a pretty good focal length for portrait work, so the nifty fifty has found a new niche as a portrait lens with entry level digital photographers - like me.

Giving it a go...
Anyway, I gave it a few tries this morning - keeping it seasonal of course.  Obviously, I wanted to use the full power of the f/1.8 aperture, and focus as close as possible for maximum effect.  I set the camera up on the tripod, set to aperture priority and f/1.8, and focused at the minimum distance (45cm).  Then I hunted around the Christmas tree for a suitable bauble to capture. Initially, I tried with no lights, just to see how much light f/1.8 would capture - it worked, but today was a bit overcast and even with f/1.8, the image was 1/10 second and the bauble was moving very slightly after I accidentally knocked the tree while setting up the camera, so I got a little motion blur (you can't see it at this size, but it's there when you zoom in - trust me).


Then I turned on the tree lights to help decrease the shutter time, and also to provide a bit of bokeh (though you can see some already from the natural light in the picture above).  I love this cute little snowman peeping out from inside one of the balls.

I'm struggling a little with the manual focus at the moment, but I'm sure it'll come with practice, otherwise I'm loving my new lens, and looking forward to the opportunities it will open up for me (no more excuses, eh?)

Till next time
Happy Snappin...

Grum.

Saturday, December 25, 2010

Merry Christmas

Still just about Christmas Day here in Aus as I write this quick note to wish you all a very Merry Christmas and a Happy New Year.

I am over the moon - I got a 50mm f/1.8 prime lens and a Lowepro kitbag from my family.  New toys to play with :D  Hopefully, I'll be able to post some pictures in the next few days, perhaps something taken with my new lens.

Hope you are on Santa's 'Nice' list, and that he is kind to you.  Let me know if you got any Photography related pressies.

All the best
Grum.

Wednesday, December 15, 2010

The Lights of Christmas

No – not just another bokeh shot of lights on the tree – not that there is anything wrong with that (and it is on my list of things to try this Christmas, especially if I can get myself a nifty fifty with an f/1.8 lens in the sales)… No, this is actually the name of a new lights festival in Sydney.  A small number of buildings were illuminated with spectacular lighting displays, in a similar fashion to the Vivid festival earlier in the year.
So I had another go at trying to capture these impressive shows, at St Mary’s Cathedral again (one of my favourite locations around the Sydney CBD).  The light show starts at dusk, so the ambient lighting is changing quite rapidly to start with, making it much more difficult to judge the exposure required, but once darkness settles, it becomes a bit easier.
Due to the tricky light conditions when we arrived at dusk, I spent most of the time shooting in Manual (M) mode, basing my settings on the camera’s metering, but allowing me to easily over or under expose after chimping the previous shot (for those that haven’t heard the term, Chimping is the act of quickly checking the review of a shot on the camera’s monitor between each shot…  It is sometimes used as a bit of a slur against those who do it habitually after every shot, casting them as amateurs - but under conditions like these, the ability of a digital camera to provide immediate feedback means that you'd be a fool NOT to CHeck the IMage Preview).
DSC_2659_1024 DSC_2683_1024
Here’s the first pair of pictures that show the differing light conditions.  The first (2s at f/3.5)was taken as the light was still fading, and the pattern projected on the building’s facade is visible but drowned out by the ambient light.  The second version (6s at f/3.5) shows the same image after darkness had fallen.  The contrast between the illuminated building and the sky has reversed (the building is now brighter than the sky) and the details of the illuminated pattern can be seen.
The other issue I had (once again), was with moving designs.  Apart from the static 'title' display seen in the shots above, the show itself never stops moving, and with my basic kit lenses, my exposures were generally somewhere between 3 and 10 seconds (there was a girl sitting next to me with an f/1.4 or bigger lens taking great shots - in the dark - handheld!).  My issue, as you can see from the two images below, was capturing a design, rather than just a blur of moving colour, or the 'ferris wheel' type images I got here, as designs moved across the facade or rotated around the Rose window.
DSC_2676_1024 DSC_2682_1024
In the first of these two images, you may just be able to recognise the yellow blur is supposed to be the sun.  The overall image was fairly static at this point, but the sun itself was rotating slowly.  The image above was a 4 second exposure, but by reducing the shutter time to 1.3 seconds, I got a darker sky, but a reasonably clear (OK, recognisable at least) image of the sun rather than just a yellow blur, as you can see in the ‘winning’ shot of the day, shown below.
DSC_2677_cr_1024
I was very pleased to see pretty much exactly the same image on the front page of one of the daily papers the following morning – it made me feel a bit better knowing that their staff photographer was facing the same challenges as me ;-)

Lessons learned...?
1. Get there early to bag a good spot - though we were very lucky, the crowd wasn't that big and I was able to wander around during te ssecond cycle of the show, and get different pictures from exactly square on to the frontage.
2. Choose your angle - though I could get square on, exactly central, the images were actually less pleasing to me and felt a bit 'flat'.  I felt that this angled shot had a bit more 'oomph'.
3.  Don't curse about what you CAN'T do with your camera, but learn how to do what you CAN do, to the best of the camera's and YOUR capacity.  Sure - I'd love that f/1.4 lens the girl next to me had (and it was a Nikon, too), but even with my f3.5, I was able to get reasonable pictures, and I could probably still do better.
Thanks for looking,
and until next time – Happy Snappin’
Grum.

Monday, November 29, 2010

PP - Example 1 : B&W with selected colour

As promised, here is an example of what you can do with PP - I'll post some more, but I think each should probably have its own post.

Now, I'm not an expert by any stretch of the imagination - I've seen some things that I just haven't a clue how to tackle, but my philosophy is to break problems down into smaller problems, and tackle them one by one.  So I hope that by giving you a step by step guide to each picture, and my approach, then it'll get your own creative juices flowing, and encourage you in your own projects.

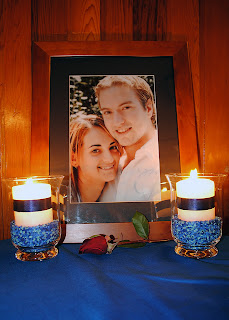
So, to start with, this was constructed from 2 full colour pictures of the same scene.  The first was focused on the rose bud, and this was close enough that the candles were also in focus - but the picture frame wasn't (more importantly - the picture itself wasn't). So I took a second picture, that was focused on the frame and the picture within it.

My first problem, was to somehow get the best bits of each picture together.  Due to the relative complexities of cutting around flickering candles vs. cutting a rectangle from a picture, I used the picture that had the rose and candles in focus, as my base.  Loading both pictures into Photoshop, I used the Polygonal Lasso to mark the internal corners of the picture frame, so I could cut the photo itself (the focused one) and copy it to the other picture.  Once I had it marked, I then modified the edges to feather them a bit, so that it didn't leave a nasty sharp edge.  I had to do a little minor tweaking to make it fit the new frame exactly (ALT + drag a handle expands equally on all sides from the centre; CTRL + drag moves a single corner or side).

So now, my completely focused image (well apart from the frame itself - but I can get away with that, as it is the faces in the photo that are important) comprises of two layers - the original image (background), and the pasted photo on top of it (layer 1).  The next thing was to merge them both into a single layer again (select Layer 1, right click, and Merge Down).  This puts everything back into the background layer again - but notice the little padlock symbol?  You can't make changes to background, so you either need to change background into a real layer (Right click on it and 'Make Layer from Background'), or create a duplicate layer (Right click and 'Duplicate Layer')

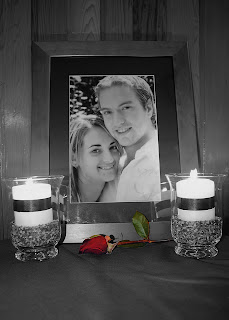
Now I wanted to make everything except the rose into monochrome.  There are several ways to tackle this, such as using the Quick Selection, or Magic Wand to select everything you want to change; select everything you DON'T want to change, and then 'invert' the selection; use the mask tool (click Q to get to Quick Mask mode) to paint over everything you want to protect...

The method I chose was to zoom in on the rose, and use the Magnetic Lasso to trace around its outline.  This tool tries to follow edges or changes in contrast, but can get confused if there isn't enough contrast.  If you find it putting new points where you don't want them, just hit the backspace key a few times, and it erases the last few points entered.  Watch the cursor carefully when you get almost back to your starting point, and you will see the little plus sign change to a circle - this means it can recognise the start point and if you click now, it will close the loop.

So, having selected the rose, the next thing was to invert the selection as I wanted to select everything EXCEPT the rose.  To invert the selection, press Shift + CTRL + I (the marquee around your selection won't change, BUT you'll see an extra marquee appear around the edge of the whole image).  Now, anything I do will affect everything but the rose.

There's a few ways to get the monochrome effect - all of them in the Image | Adjustments section of the menu...
  • Desaturate instantly drains all the colour from the selected part of the image
  • Black and White does the same, but then allows you to play with 'colour' levels - the effect is to change the contrast of the black and white image as though it were taken through different coloured filters - you'll have to play with it yourself - it's a bit difficult to appreciate unless you have used coloured filters for black and white film photography (which most people these days haven't...)
  • Hue/Saturation - this gives slider controls so you can gradually drain the colour, strengthen the colour, or change the brightness - all this can be applied equally to the picture ('master' channel), or individually to Red, Green, or Blue channels)
Personally - initially, I just desaturated it - and got the example above, but then I played with the Hue & Saturation levels to leave a hint of colour - you can see from the original that the frame was a lovely golden colour in the candlelight, and the stones around the candles were bright blue, but all those colours were a bit too strong.  Anyway, here is the finished article - I hope you like it.

Footnote - I did not take the original portrait, and it would be lax of me not to acknowledge the original photographer, though I don't know who that is.  It's not really the 'done thing' to make changes to somebody else's photo - though technically - this is my own photo, that happens to include somebody else's photo in it... so I think I'm covered.

Saturday, November 27, 2010

PP? What's that all about?

I've probably mentioned it several times in previous posts, and just took it for granted you knew what I was talking about - but for those of you don't... PP means "Post Processing".

It encompasses anything and everything that you might do to the image after you download it from the camera to your computer. Actually, many cameras now allow you to apply PP while the picture is still ON the camera - so technically, it is any manipulation you apply after TAKING the picture.

PP ranges from the basic 'crop' (to select the best part of your image), to slightly more advanced manipulation of contrast or brightness of the whole picture or removing red eye reflections, through to advanced manipulations involving multiple images in layers like a stack of pancakes, with bits erased here and there so different layers show through, effects such as sepia applied, blurring backgrounds, sunny skies removed and replaced with moody stormy clouds... the possibilities are limited only by your imagination (hey - that sounds like a great tagline... uhm...)

So what do you need to 'PP' your pictures?  The ultimate tool, and probably the one most professionals and enthusiasts use is Adobe's Photoshop.  However, it IS expensive (note to Adobe - please make it more accessible to the rest of us), and there are alternatives available.  The GIMP is free, and has a lot of the most commonly used Photoshop capabilities.  Adobe also has Photoshop Elements, which is a simplified version of Photoshop with an easier interface aimed at the 'consumer' market, and also Lightroom which is kind of a halfway house - a simplified version of Photoshop but aimed at the 'prosumer' market (I hate that word - so pretentious).  Other programs also give access to various levels of manipulations, such as FastStone Viewer, or the Apple Mac's iPhoto application.

Many web based photo albums, such as Picasa, photobucket, flickr, facebook, and more, have links into an online tool called Picnik, which gives all kinds of cool fun effects you can add to your photos, though it is aimed more at the fun effects, rather than as a serious contender for a Photoshop replacement.  You can also use Picnik directly on the pictures from your own PC.

So, apart from removing red-eye from Aunty Mabel, cropping the picture so cousin George is no longer in it, and boosting the contrast on that rather washed out landscape that you accidentally over-exposed... what can you do with PP?  What is the point?

In the next post (and I promise to put some pictures in that one) or soon anyway - maybe not the very next post... I'll give you a few examples, and talk you through how they were created.

Till then,
Happy Snappin

Thursday, November 25, 2010

Into the light... take 2

Same bungee trampoliney thing, but this time at my niece's school fair, so the queues weren't nearly as bad - and look - blue sky :)

I'd learned some lessons from the previous attempt (see September's posts), and with the clear blue sky, there was a definite source of light rather than just a general bright backlight.  Luckily, the sun was behind me over my left shoulder, so I wasn't having nearly so many exposure problems this time.  It was so bright that I was getting exposure times in around the 1/1000th second area, though this was again using 200 ISO and aperture priority set to the widest aperture (this automatically adjusts to maintain the widest aperture possible as I zoom in and out).

I set the Exposure Compensation to +2/3 of a stop - with the sun so bright, I was getting quite contrasty shadows.  I knew that the on-camera pop-up flash wouldn't be anywhere near strong enough to make any difference as a fill-flash, so the idea was to use Exposure Compensation to try and lighten the shadows a bit.  I haven't done any PP work on the lighting side of the picture, so I think I got it about right (more by luck than judgement).

The other two things I did were to set the auto focus to continuous mode, and set the shutter to burst mode.  These two settings allowed me to concentrate on panning up and down and zooming in and out to get a good composition, while the camera maintained the focus all the time, and I could just hold the shutter button down and fire off 4 or 5 shots in a row.  Last time, I was quite horrified to find I'd taken 70-80 shots... imagine my surprise when I found I had taken 327 this time :-o  By the time I weeded out the ones that hadn't focused, that had her feet or head or something out of shot, and all the ones where she was at the bottom of the cycle (there was some background clutter that made these less attractive), I got down to 77, but a lot of those are pretty much the same with very little to choose between them.

I ended up choosing this shot and cropped it in tight to the top half of her body (the whole shot was full length), so that we can see the expression of joy on her face.

Hope you like it :)
Till next time
Happy Snappin'
G

Wednesday, November 10, 2010

The rule of thirds

In a previous post, I mentioned cropping a surfing picture of my son’s friend, Mike, so that it conformed to the ‘rule of thirds’.  So what’s that all about?

sm DSC_1755_thirds
In simplest terms, if you imagine a noughts and crosses grid over your picture (or tic-tac-toe, depending where in the world you grew up), then this divides the picture into 9 blocks – you’ve split it into the ‘thirds’ that the rule refers to, both vertically and horizontally. 

The idea behind the rule is that by placing elements of the picture on the lines that mark the thirds, or on the points where lines cross, the resulting image is more aesthetically pleasing.


Below, I’ve got 3 versions of the same picture (I’ve tried to keep them all with the same 6x4 aspect, and the same level of zoom, to make comparison easier).

The first two versions centre Mike in the picture, which often seems the correct thing to do when taking the picture.  One is centred on his body and doesn’t look too bad – but it’s a typical holiday snapshot, the image lacks space and movement.  The second version centres on Mike’s head, and is just plain wrong on many levels… there is too much wasted space above him (so much so, that to get the same level of zoom, it actually went beyond the bounds of my original photo), and it almost looks as if he is running out of water and grinding his board into the bottom of the photo. 

DSC_1755 body


Centred on body
DSC_1755 face


Centred on head


(If you are wondering about the skewed top edge in the second shot, it’s because my horizon wasn’t quite straight originally, and so I had to apply some rotation to the whole picture to straighten it out…)


DSC_1755_crFinally, here again is the one I originally posted, that uses the rule of thirds as shown above, to place Mike on the left line (well almost – I didn’t actually have the grid when I did the crop, so it was all judged by eye), and the line of the wave along the bottom line.  As you can see in the ‘gridded’ version above, by happy accident, the following wave is just starting to break and lines up nicely with the top line on the right. 

Compare this version of the picture with either of the two versions above, and you’ll (hopefully) start to see this one has a certain “je ne sais quoi…” (something or other) about it, that transforms it from a ‘snapshot’ to an ‘image’.

If you want to learn more about the rule of thirds, and other compositional concepts such as ‘Lead Room’ (that’s the space ‘in front’ of the subject that the subject is moving into or looking towards…), ‘Head Room’ (that’s the space around someone’s head in a portrait type shot), or the ‘Golden Ratio’ (not sure I get this one, but unless you are handy with a slide rule and have a degree in geometry, it’s more likely to just ‘look right’ as opposed to understanding the maths behind it), then have a look around the net.  Wikipedia is always a good starting point.

Until next time,
Snappy Happin’
Grum

Tuesday, November 9, 2010

Canberra revisited - Remembrance

You may remember back in June, I visited Canberra, and got some shots of the War Memorial at dawn.  Well this weekend we went back, and I was able to have half an hour there for myself in photo-mode during opening hours. The Roll of Honour was my target this time - especially being so close to remembrance day. 

You may remember me mentioning that I had in mind a shot exploiting DOF and a shallow angle along the wall, to have a single poppy in the foreground in focus, with a background looking like a solid wall of red, from out of focus poppies seen from a shallow angle. 

Here's what I got...  I was pleased with it, but it's not perfect... I liked the fact I had people way off in the distance, as this gave a sense of scale and distance, emphasising how far the wall stretches, but I didn't like the blank field between the cluster of focused poppies and the start of the de-focused poppies after the next panel.  If the panel had names on it, this may have been more interesting visually, but I didn't think it was too respectful to start shifting poppies about, just to suit my vision.

So, to get the DOF, I shot with my lens wide open (f/5.6 @ 55mm).  I felt that 55mm gave a good balance to the depth without foreshortening it (longer focal lengths) or showing too much extra stuff that I'd only want to crop out anyway (shorter focal lengths).  I pretty much always shoot at ISO100 - so I don't need to tell you that... the light conditions forced me to hand-hold at 1/30, but since I wanted a shallow angle of view, I was able to brace myself right against the wall (being careful not to dislodge any poppies, of course).

Yes - I was pleased with it. Could do better, but it'll do for now.

Until next time
Happy Snappin'
Grum.

Wednesday, November 3, 2010

Back in action


You will have noticed that I haven't posted in a while.  I've had a busy few weeks organising my son's wedding and hosting guests from abroad - so no spare time for fun photography, or blogging, etc.  But I'm back now, and yes - the wedding was a great success and the sun shone from a brilliant blue sky right up until they left for their honeymoon (thanks for asking).

So, what to post?  Well, while I was acting as host and tour guide to the best man, who had travelled over here from the UK, we visited the Motor Show in Sydney, went surfing, went to the wedding (obviously), and then the whole party went on a jetboat tour around Sydney Harbour the day after the wedding (it was pretty miserable weather, but they were going to get drenched in seawater anyway...)

I've already posted the best of my Motor Show shots on flickr and some on DPS, so I'm not going to repeat them here (just follow the links from the sidebar if you want to see them), and I'm not sure I should post the wedding shots, so that leaves... surfing :D (at this point, the chorus of the Beach Boys "Surfin' USA..." should start playing in the back of your head - and now that I've suggested it - it's going to plague you for the rest of the day...)

So - some things to consider for surfing pictures...

  1. It is inevitably going to be windy, with sand and/or salt spray blowing around.  You don't want this inside your camera, so go with the correct lens already in place - or go back to the car if you need to change lens at all.  Probably also a good idea to have additional protection such as a UV filter on the lens, and a plastic bag around the bulk of the camera - especially if there is a lot of salt spray around, and some sunblock for yourself (but DON'T keep it in the camera bag... you just KNOW the tube will split, or the top come off, and cameras don't really need or like sunblock)
  2. If you are taking pictures from the shore, the action will be far away - you'll need a longish lens or lots of extra megapixels to allow you to crop later without losing resolution.  My 200mm could've done with another 100-200mm to get me closer in, since my camera has a (normally quite adequate) sensor of 10MP only.
  3. If you are out on the water either in a boat or on a board yourself, then a waterproof camera or casing is probably advisable ;-)
  4. Some locations may offer the chance to get out in the vicinity of the surfers via long jetties or headlands that stick out into the water - take advantage of these for sideways action shots along the line of the wave, if they are available.
  5. If you've got really big waves, keep down low so that you can see them towering above you (and the surfers) and always get a surfer dude in the picture for scale.
Well, I was on the beach, head on to the waves, with the odd big wave but mostly just a gentle swell, and a nervous surfer on a brand new board (that he had blown half his holiday money on in the first day), with tales of blue-ringed octopus, great white sharks, and blue-bottle jellyfish someone had very meanly implanted in his brain (poor kid - mwah-ha-ha!).  This was obviously not going to be a spectacular shoot, but I wanted to get some shots of him on his new board, that he could take home to his proud mum and surfin' buddies in England.

I had the camera set to 'continuous' focus mode, so that it would automatically keep in focus as he was riding the waves in.  I could have used aperture priority and selected a small aperture to give me a large depth of focus (see Lesson 03 from August), though this would've meant longer exposure times and risked potential blurring given that I was at extreme zoom.  It was actually a lot brighter than I realised, and at f/5.6 I was getting shutter speeds of around 1/800 to 1/1000, so I could possibly have gone to f/8 or f/11 with a fixed manual focus point, and just relied on DOF rather than continuous focus - but what the heck.

After missing several shots, I realised I should also be in 'burst' mode, so I could fire off a handful of shots and capture the entire period from getting up on the board to getting dunked again, though his runs frequently lasted only enough time for me to get three or four shots in, even in burst mode (LOL - sorry Mike ;-) but it's OK - nobody actually reads this, so your secret is safe).

You'll need to be patient if you are following a particular surfer, as one good ride that lasts 5 or 10 seconds means a wait of 5 minutes while they paddle back out again, and then another 5 minutes while they get their breath back and wait for the next good wave.  If you are shooting a competition or a busy beach, then you are more likely to have continual action to choose from.

Finally, when I got home and zoomed into the tiny specs in the middle of my pictures, I was able to crop and get a few reasonable pictures, such as the one above, that retained enough pixels to still print out at 6x4".  This is one of the few occasions I'd agree that a 20MP camera is worthwhile - but if you are going to be getting serious and regularly shooting surfing action, then you'll probably not be content with your entry level dSLR and kit lenses anyway.

You'll see that I cropped this one using the rule of thirds (with Mike towards the left of the picture, and the line of surf in the lower portion), giving him room on the right to surf into - this is just a trick of composition that adds to the 'dynamic' of the picture - but that's a subject for another day.

Till the next time,
Happy Snappin'

G

Tuesday, September 21, 2010

Into the light...

This weekend, I found myself shooting in some very difficult conditions.  Here's the scenario - I'm standing on the ground, looking up into a bright though overcast sky (very bright).  My niece is on a fairground bungee trampoliney thing, that is on a lorry trailer (so the base of it is at my shoulder height to start with), and she is bouncing 10-15 feet further up in the air...

Obviously, I couldn't ask them to move the trailer around a bit, I couldn't get any higher than I was to avoid having sky as a backdrop, nor further away to reduce the angle... and having queued for nearly an hour, I wasn't about to suggest coming back later when the light might have changed!  I just had to try and do the best I could.

The first thing I did (making good use of the queue time) was do some practice shots of other children on the ride - got a few 'looks' from their parents, but nobody actually approached me or hurled abuse at me...

  • Shooting a reasonably wide shot against the bright sky was fooling the camera into giving me silhouette type pictures with a blown out white sky, and no detail of the children's faces.
  • I tried zooming in more on the child's face or body, and spot-metering off that.  This gave better results, but it was very difficult to pan smoothly with the constant up and down motion - so it was difficult keeping the spot-metering point centered on the child.
  • The constant up and down also quite drastically changed the angle of view between the top and bottom of the jumps, making it difficult to decide at what point to set the zoom.
  • I also tried matrix metering, but that didn't seem to make much difference.
  • I set the exposure compensation up by several notches to +1.7 in an effort to get more detail in the shadows.
  • I also tried out 'burst' mode to help get a good shot while panning vertically.
In the end, I stuck with the over-exposed compensation, combined with spot metering, burst mode, and being zoomed out as far as I could and still be able to keep the center-spot reasonably well on the child.

I was shooting in aperture priority, with aperture as wide as possible, in order to get the quickest shutter time I could (I also increased the ISO to 200 from my preferred 100).

I was aiming for a shot as she was coming down, so that her hair would be streaming out above her, and this pretty much guaranteed I'd have to be looking upwards for the shot and have that nasty blown out sky as the background.  I took about 60-70 in all, playing with various zoom levels, and got 3 or 4 that (with some PP work) were good enough to show her parents (thank goodness for throw away digital film)...

This shot was one of the last ones I took, so I guess that I was getting better the more I practiced.  I only cropped this very slightly, so what I saw in the viewfinder was pretty much what you see here.  I think that helped me to be able to keep the metering spot on her rather than taking in too much sky.

I was quite pleased with this one, and it was the one I chose for her parents, but getting it was more by luck than judgement.  With hindsight, there are probably a couple of other things I should have tried...
  • switch on the flash (d'oh!! how many times have I told myself to use the flash in bright conditions!!)
  • switched to manual mode to find a combination of aperture and speed that gave me the exposure I wanted on her face, and stuck with it - rather than have the camera constantly re-evaluating all the time.
Oh well, I'll have another go when the fair comes to town again next year (and probably forget everything I've said here, all over again!)

Until next time - happy snapping
G

Friday, September 10, 2010

Auto-this, auto-that...

With auto-focus and auto-exposure, the camera is doing so much of the work for you, all you really need to do is concentrate on the composition... isn't it??

Don't be fooled - the camera isn't infallible, and can sometimes make mistakes that would make even the worst photographer look good.  Well, technically, I suppose, the camera isn't making mistakes, but it is being fooled into making a poor decision. 

Here's an example - I had a pigeon trying to steal my lunch while I was sitting in the park.  He was a cheeky little blighter, and was sticking really close to me, no matter how much I tried to shoo him off, so I thought I'd get the camera out and try and get a worm's eye view shot.  From this low vantage point, where I couldn't get my head down low enough to check the viewfinder, I had to point and hope that the auto-everythings worked for me, but no, the camera decided that despite the pigeon being right in the middle of the picture, the people in the background were obviously what I wanted to focus on ;-)  Thinking about it, I have never had a clear picture of a pigeon - I wonder if my camera is prejudiced?


I had to laugh - I think it came out quite well :D

So, what was today's lesson?  For best results, even the most sophisticated camera in the world needs a photographer to be in control of it...  Auto-modes will give a good result most times, but you really do need to learn to take control if you want that special shot.

Tuesday, August 24, 2010

Lesson 03 - Depth Of Focus (DOF)

I haven't had much chance to get out and about photographing 'stuff', so I thought it was about time to post another official 'lesson'.  Today, I'm going to talk about something you'll often see referred to as DOF.  DOF stands for Depth Of Focus (it also stands for Depth Of Field - there is a technical difference that I won't bore you with, but they mean the same thing as far as your pictures are concerned...)  DOF is about how much of your picture is in focus - from the closest things to the furthest things.  Let me show you an example...


In this picture I took while wandering around Hyde Park, it's obvious what the picture is of... isn't it?

Of course it is - Poppies!  Lots of them... all different colours, close-up, middle distance, far away... Poppies, Poppies, Poppies!

In fact, there are probably a few too many Poppies.  When you first look at the picture, your eye may be drawn to the white one in the middle, or the orange one at the bottom, but then what..?  Your eye wanders around trying to find other things to focus on and look at...  hmm - that's an awful lot of Poppies - just excuse me for a few minutes while I check out each one...

This is where we can use the concept of DOF to help.  Roll down to the next picture of the same scene.


Now, see the difference?

Immediately, the eye is drawn to the cluster of Poppies at the bottom of the picture (ok - this is purely for demonstration purposes - don't start flaming me for the really lousy composition). Your eye may then briefly check out the rest of the image - discover there is nothing much to report, and return to the real subject and check it out in more detail.

So used in this way, DOF is being used to isolate a particular part of the image by keeping it IN focus, and making as much as possible of the rest OUT of focus.

DOF to isolate a subject like this works best with something close, and a reasonably distant background, such as the scene you see here, or portait close-ups for example.  The closer you can get to the thing you want in focus, the 'shallower' your depth of focus will be - check out a few macro shots of bugs, that are taken from just a few inches away - even in the width or length of the bug, you'll see how one part is in focus, and the rest (just a fraction of an inch away) is out of focus. 

So what did I do differently in the two pictures?  Change the aperture - that's all (ok, you got me - when I changed the aperture, the camera changed the shutter speed accordingly, to keep the same amount of light coming in to the sensor).  The first shot was taken with a very small aperture of f/32 (remember - big number means small hole).  This renders a lot of the picture in front of and behind your subject, in focus.  The second shot was taken with a wide aperture of f/5.6 - this reduces the front and back focus spread considerably.

Having mentioned macro photography, this introduces the other side of the DOF coin.  In this case, you want to increase the DOF as far as you can to get more of that bug into focus.  How?  Well, the easy part obviously, is to use a very small aperture - as small as you can get.  However, since the idea of macro work is to get really close, the other option of distance is out of the question - it's no good having your bug 6 feet away to ensure the whole thing is in focus...  Working with a small aperture will mean longer exposure times, and this may lead to needing extra lighting, in the form of flash, studio lights, or a light box/tent, or perhaps a ring flash for macro work (just be careful not to cook your bug) - however, before I get too carried away, lets stop there, and accept that (assuming you have enough light) you can increase your DOF by using a small aperture.

So, in summary...
  • DOF (Depth of Focus or Depth of Field) is an indication of how much in front and behind your subject is in focus. 
  • Use a wide aperture to get a 'shallow' DOF, and isolate your subject against a blurry backdrop. 
  • The closer you can get to the subject, the greater the isolating effect of DOF is.
  • Use small aperture (and possibly more light) to get a deeper DOF, and have more of the foreground/background in focus.
Until next time
happy snapping.
G

Tuesday, August 17, 2010

Right Place, Right Time...

I took my camera into work yesterday - it was a lovely sunny day, and I planned to go out for a photowalk at lunchtime... which I did... and I got some photos - but I'm saving them for another day.  Half way through the afternoon, there was a load roaring rumbling vibration outside my 23rd floor office window, and just outside was an Army Black Hawk helicopter, buzzing around and between the high rise offices - I grabbed my camera, and started snapping away - but after the excitement of getting the first few shots, I started to think a little more about what I was actually doing.

The camera was set on ISO 400 and P mode (which on my camera seems to give a wide open aperture, and adjusts the speed accordingly as its starting point) - so with ISO 400 and f/5.6, I was getting shutter speeds of 1/800 and 1/1000 second - which was freezing the rotor movement (but giving me crystal sharp pictures).

I wanted a bit of blur on the rotors, so I adjusted the balance towards a much smaller aperture of f/20 - but I think that was too far, as it gave me shutter speeds of around 1/80 second - which combined with a 200mm lens - even with Vibration Reduction - is a bit too slow.  So the next few shots gave me the motion blur on the rotors, but at the expense of blur everywhere else too :(


I decided that sharp pictures were the better option, so I opened up the aperture again, but did reduce the ISO to 200, as the 400 setting was going to give me some grainy noise - especially if I had to crop into the detail too much.  Luckily, the sun was bright, and I was still able to get pretty quick shutter speeds.

The helicopter was doing some manouvres from down low (way down below me), and swooping up towards me, then banking off behind the building opposite, before popping up over the top - right at my level.  In the first picture (uncropped), you can see how hard it is to see the helicopter at all - but the next two are crops into the detail of that same photo, and a second pass a few minutes later.  I call these my Quentin Tarantino shots.
I think the second pass shot was more successful, due to the lighter background of buildings, and also the angle of the helicopter.


Then it popped up from behind the other building - it was like an action movie.  I quite expected a force of elite paratroops to drop down ropes onto the roof and invade the building... Now that WOULD have made a good shot - and it would have been sold to the Sydney Morning Herald by now!!!


As it finally departed for goodness knows where, I caught this last shot as it left its shadow on another neighbouring building.

In all, I had 9 minutes of shooting time of this spectacular close-range display of flying.  Boy, was I glad I chose to take the camera to work!!


Until next time - keep snapping.
G

Friday, August 6, 2010

Man on a mission

In an effort to drag myself out of a period devoid of photographic excitement (I hadn’t taken a single photo in over three weeks), today I set out on a mission to put things straight – and check my camera still works!
The current assignment on the Digital Photography School forums seemed like a good starting point – “Motion Blur:People or Animals”.  I figured that a photowalk in the city should offer me plenty of opportunity, so I went out during my lunchbreak.

Now, obviously to catch motion as a blur, requires a longer than normal exposure, so I tried a couple of approaches… the first was to use the camera in Aperture Priority mode, and set the aperture as small as I possibly could (remember – a small aperture has a BIG number).  This would ensure that the camera would use the longest exposure I could possibly get for the light conditions.


I hopped on a train to Central and tried a few locations on the platforms - my first real experience of 'street' photography. I got a few odd looks from people, but nobody actually assualted me either verbally or physically - which was encouraging. So I tried getting people getting on and off trains, but...


...problem – NO TRIPOD!  Using this method, I was sometimes getting exposures of around a second.  Not ideal for handheld pictures – even bracing the camera on the back of a bench was still giving me blur where blur ought not to be...

I switched to Shutter Priority, and adjusted the length of the exposures myself (between 1/20th and 1/4 of a second), to take more control over the amount of blur.  I quite liked this one of a girl standing perfectly still checking her phone, with all the movement going on around her.  I chose this one as my entry for the assignment.


Finally, I walked back to my office, and decided to have a final play at this busy crossing.  I was quite pleased with it, but I think the exposures were a bit on the long side, as there is too much 'blur' and not enough 'people in motion'.  I think the one above has just the right amount of blur, but this one too much.


So - I got out for a walk for a change, broke out of my photographic doldrums, and got the grey matter working to think about my motion blur exposures.  But what did I learn?
1 - don't attempt long exposures without a tripod... Well, I knew that, but had to do the best I could with what I had to hand...
2 - motion blur isn't JUST about a long exposure time - you have to ask yourself "just how long does long have to be".  What kind of motion are you trying to catch - leave it too long, and it becomes somewhat less obvious where it is motion, and where it is just a ghost...

Until the next time...
Happy Snapping.

Wednesday, July 21, 2010

Cold Foggy Canberra Dawn

A trip to Canberra at the weekend, and a hotel conveniently just 5 minutes from the War Memorial, gave me the opportunity to leave my wife snuggled up warm as toast in bed, while I ventured out into the sub-zero pre-dawn streets to get some sunrise pictures.  First of all, let me admit that having spent 6 years in Australia has made me soft and I'd forgotten what 'cold' is... though I'm sure that there are many other photographers around the world that cope with far colder conditions than the -2C that I did that morning.

I arrived at the War Memorial a little before 7am, and had in mind to get a time-exposure of the building still illuminated by the lights, but with some light in the sky.  I found a good spot and got the camera and tripod setup, but then just as I was ready to go, the lights all went out - so that shot got struck off my list.

Behind me, looking down Anzac Parade, there was a wall of fog across Lake Burley Griffin, hiding Parliament House.  With no cars on the road, it was quite an impressive sight with just the flagstaff visible above the fog, but then the sun rose enough to just catch the flagstaff and give a golden reflection off one side.  Luckily, I had the camera setup in that direction.  This is straight off the camera, with no colour correction applied, so a lot of the foreground is very blue whereas in reality, the fog bank appeared very white - I need to do a bit of PP work on it still.


The next shot I had hoped to get was of the sun rising over the hill behind the War Memorial - the effect I had in mind was a deep blue sky and brilliant burst of golden sunlight coming over the silhouetted hill, and the War Memorial in the foreground.  But I wanted the building illuminated (either artificially or by a time-exposure).  As you can see - it didn't pan out the way I wanted...  I am pleased with the sky, sun, hill, tree exposure, but completely lost the building itself.  I tried another shot exposed for a meter reading off the building frontage, but in that one the sky got completely blown out, and the sunburst was drowned out by reflections/refractions/dust particles.  I took a number of different exposures, at both extremes of the scale, and may try combining them with an HDR type tool (see below), or by just careful erasing of superimposed layers (more late nights with Photoshop obviously required).

I wanted a couple of other shots as well - one (obviously) of the building illuminated at night, and another looking along the Roll of Honour, focused on a foreground poppy with the wall and poppies extending off into the distance and out of focus - I can see it in my mind's eye - just need the correct execution.  However, other priorities (we were there for a family occasion after all) meant that I didn't get to the War Memorial either during opening hours or at night (getting up at 6am for the dawn shoot was bad enough - without another visit at 2am!).  I obviously need to plan another trip... :D

Till next time...  Happy Snapping.

Oops - forgot to explain HDR...
I'm not entirely clear of all the teckie details but as a basic explanation it combines multiple images with varying exposures, and sort of averages them out, taking the best from each - so it replicates better what our eyes see with the benefit of our built in processor units that automatically adjust for shadows and bright areas.  It's not a very good explanation - so I'd suggest looking at this article in wikipedia - the first set of sample shots illustrates the process far more eloquently than I can ;-)

Wednesday, July 14, 2010

Flickring

I haven't had much of a chance to get out and do any photography over the last couple of weeks, but I have a trip to Canberra soon, and hope to get some photo opportunities then.  So I figured that I ought to add somethying to the blog otherwise I'm in danger of having the whole month go by with just a single article... NOT the way to encourage one's readers to come back for more! 

So with no new photos to play with, and having exhausted the few good ones I have already, I was having a look at flickr (no - I don't have an account - or rather, I DIDN'T have an account - probably one of the few people in the world that has resisted both facebook and flickr thus far), just to see what all the hype is about.  I already had a Yahoo Messenger account from years ago, and somehow when I went to the flickr homepage just to have a look, I suddenly found myself with a flickr account being created... I don't remember asking it to do it, but I'm just a poor old man, my sight is dim, my eyes are poor (my nose is nackered) - who knows what buttons I accidentally clicked :-o

Well, once it had gone to all that trouble on my behalf, it seemed a bit churlish not to reciprocate, so I uploaded a photo.  It was so easy, I did another one, and another... "Whoa there," I thought to myself "let's not get carried away... I never actually wanted this in the first place".... so I created a couple of 'sets' to put my photos in. It was too late - I was getting carried away! Having created some sets, I needed to post more photos to fill them - and so it snowballed (in a very minor way compared to some people - I have a grand total of 16 photos, which have been viewed 41 times at the time of writing - others have thousands and thousands of pictures).

A couple of friends of mine in NZ then left me some comments on a few pictures, and even added a couple to their collections of favourites (I am sure they were just being kind to me, to make me feel welcome)...  I added them as 'friends' and now I see their latest pictures on my page (as does anyone else that navigates to my page - I think).

Then, I got invited to join a group - OMG!  A new frenzy of activity started... as well as having my photos in my photostream, and categorised into sets, I could now share them with the group.  Then I found out that many groups are public, and don't actually need an invite for you to join them... Woohoo - so off I went on a search for other groups that might appreciate my pictures.  I think I've joined up with about half a dozen now, each specialising in something or other, from long-exposures and night time cityscapes, to anything taken with a Nikon D3000... (I also found one for the pics I took with my daughter's D40x before I got my own camera).

I'd been happily trundling along like this for a few days, when 'bang', another little surprise... someone found a picture I had posted just in my own photostream, by a search matching a tag I had given it.  I got a nice little note saying they would love to include my picture in their group's collection, and also inviting me to enter it in a competition they are running this month... well, hey! That suits me just fine :D

Yup - now I know why I tried to resist for so long... I haven't even had the account for a week yet, but I'm already checking my homepage at least 4 or 5 times a day to see if there are any more comments or messages, or if anyone has added my pictures to their 'faves' and so on.  And when there was a whole day with no new messages, I went off in search of new groups and new audiences to hang my wares in front of... Yes, I'm hooked good and proper.

If anyone's interested, I've added my flickr site to the list of links at the side of the blog - feel free to drop by and have a browse (it won't take you long - unless you get sidetracked into looking at the photos of my contacts as well, or the groups that I belong to - which after all, is the whole point of flickr - and facebook come to that - in the first place) and leave me some comments, or perhaps link me to YOUR flickr site.

Until the next time... (hopefully with some actual photos!)
G

Thursday, July 1, 2010

Fill-in Flash and Bokeh

I was out for a walk today, and being mid-winter here in Australia, the sun was low in the sky, and yet the sky was blue and not a cloud in sight.  Looking out across the harbour, the sun was reflecting off the water brightly, and I was trying various ways of shooting into the light.  Then, I came across this seagull, sitting on a post, and I was able to position myself so that it was against all that sparkling water - the effect I was after is called Bokeh.  You've all seen it - you probably just didn't know it has a name... it's the effect you get when a point of light is massively out of focus.  What happens is that the out of focus 'blob' of light adopts the shape of the hole through which light is entering the camera.  In most cases, that will be pretty much a circle, or a roughly circular something-agon (depending on the number of blades in the iris of the lens - the more blades, the closer to a true circle it will be).  So, because I was focused quite tightly on the gull just three feet away from me, and those sparkles were way out in the harbour, even at f/8 they were very unfocused and I was able to see some Bokeh effect.  You can see it especially to the right of the gull's head.

Bokeh can be used a little more creatively than just blurry circles of light forming a backdrop.  By cutting a circle of black card that will fit inside a filter screwed to the lens, and then cutting a shape (a star for example) out of the middle of the circle - you have an instant Bokeh maker.  Just slip the circle of card over the lens, and screw on the filter to keep it in place, then go out in search of some sparkles (for those of you with Point and Shoots - you may need to use some other means of mounting the card to the lens - you could try Blu-Tak, but I'd avoid taping it on - also beware of lenses that retract into the camera behind little slidey doors - don't want to accidentally gum those up with any sticky stuff when the camera unexpectedly switches itself off while your Bokeh card is still attached). 

Any pinpoints of light will do - distant street lights, xmas tree lights, sparkly reflections on Sydney Harbour...  As soon as you defocus them, they will adopt the shape you cut in the card.  Give it a try and have some fun - try theming your Bokeh maker with the photos, like hearts for a luvvy-duvvy couple portrait ;-)  Also try cutting bigger holes and small ones to see what difference it makes, or try cutting several holes in one bit of card.


Now, while I was pleased to get the Bokeh I wanted, sadly, there was just too much of it, and it was too bright over most of the photo - so much so, that on the uncropped version the seagull almost looked like it was in silhouette.  I retrieved it somewhat by cropping out a lot of the very bright reflections to the left, but I was still left with a rather grey looking seagull, which in reality was brilliant white (Dulux would have been proud of it).  What I should have done, was popped up the flash.  You might think it strange using the flash in such bright conditions, but remember - I was shooting into the sun, so anything facing the camera was hidden in its own shadow.  In these circumstances, by letting the flash go off as well, you can illuminate the shady side of your subject to lose some of that silhouette look.  I wish I'd thought about it at the time, so I could have posted a with and without comparison.

My lesson learned for today?  Think about flash when shooting a subject against the sun.

Until next time...
happy Snapping.

Sunday, June 27, 2010

Cheap filters - update

You may remember that I bought some really cheap filters off ebay, partly as an experiment to see what sort of quality they would be, and partly because I had no spare cash, and really wanted to at least get "UV lens caps".

Well, after a month of using the UV filters, I've taken one off and returned it to it's case - probably never to be used again.  During the day it was fine, but I was getting some pretty nasty reflections on all my night-time shots (you may remember the UFOs in my 'Vision in Blue' fountain shot?).

The other UV filter seems to be behaving better at night, so it has earned a reprieve and is still attached to my 18-55 lens.  I still haven't used the polarising filter, so no comments there yet.

I'm now looking at possibly buying a cheapo x8 or x10 ND filter to get some of those long exposures on waterfalls and streams during the day, rather than having to wait for low light conditions.

Friday, June 25, 2010

Perspective Shift - 2

After my Perspective shift post earlier this month, Kate left a comment asking if I could take another picture for her, from closer to the building, looking more or less straight up.  I think the effect she wanted to see was more of an overlapping ripple effect.  Kate - these are just for you.  I've not done anything with them as I was just wanting to see if I could recreate your vision, so please excuse poor quality and/or exposure... 
Let me know if these are what you had in mind ;)

Tuesday, June 22, 2010

Parramatta Sunset

Went to a christening this weekend, and spent a happy time wandering around with the camera, but then saw this gorgeous sunset over the river, and just had to forget the proud parents and baby for a few moments (I don't think they minded too much).  I like this shot in this vertical format with all the texture of the water ripples in the foreground, but I think it would also work well as a horizontal crop of the top third - perhaps from just above the little cloud, down to the first of the dark ripples that crosses the sun's reflection.

I have to admit - I got shutter-happy, and shot 22 pictures in 3 minutes!  I was just spot metering from everywhere and anywhere, holding exposure lock, re-aligning and shooting.  I honestly can't tell you where this particular shot was metered from - I was just concentrating on the boat and waiting for it to cross the line of the reflection...

Sadly, there was a crane and a TV antenna on the horizon flanking the sun, which I've had to patch out using PP.  I rushed it a bit and it isn't as good as I'd have liked - but reduced down to this size, I don't think the blemishes are too obvious (I've seen a lot worse PP examples!).

What do I mean by spot metering and exposure lock?  Let me try and explain...
In a scene like this, different areas present a huge variation in light levels, and this makes it difficult to expose the whole image to get a balanced feel.  Spot metering means that you nominate one small area of the whole image (I think the D3000 has 11 to choose from) on which the camera should base its exposure calculations.  You can line up the shot, and then cycle through all the little metering spots to take a reading from different parts of the scene.  Alternatively (and this is the method I prefer), leave the spot metering on the one little segment right in the center of the viewfinder and just point the camera where you want to meter from.  Then, use the exposure lock button (sorry, you'll have to get the book out for how to do that on your camera - on mine, its a button marked AE-L/AF-L, but you have to assign the right function to the button in the config pages... :( ).  Exposure lock allows you to take a reading from one point, and 'lock it in'... then you can move the camera to line up the shot you really want, and it will take the shot without re-assessing the exposure.  So if you have an image like this with an extremely bright sun which will ruin the exposure (and confuse the camera hopelessly), then take a meter reading from the sky a little to the side of the sun, or off the reflection of the sun in the water, or off the reflection of the sky in the water... just experiment metering from different places - light and dark, to see what affect it has on the image.  Unlike me though, its a good idea to make a note of what you did for each experiment, so you can make sense of the results three days later when you finally get them off the camera :(

Until the next time....