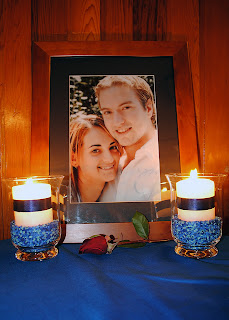
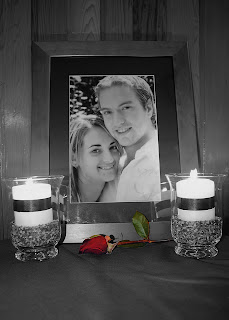
Now, I'm not an expert by any stretch of the imagination - I've seen some things that I just haven't a clue how to tackle, but my philosophy is to break problems down into smaller problems, and tackle them one by one. So I hope that by giving you a step by step guide to each picture, and my approach, then it'll get your own creative juices flowing, and encourage you in your own projects.
 So, to start with, this was constructed from 2 full colour pictures of the same scene. The first was focused on the rose bud, and this was close enough that the candles were also in focus - but the picture frame wasn't (more importantly - the picture itself wasn't). So I took a second picture, that was focused on the frame and the picture within it.
My first problem, was to somehow get the best bits of each picture together. Due to the relative complexities of cutting around flickering candles vs. cutting a rectangle from a picture, I used the picture that had the rose and candles in focus, as my base. Loading both pictures into Photoshop, I used the Polygonal Lasso to mark the internal corners of the picture frame, so I could cut the photo itself (the focused one) and copy it to the other picture. Once I had it marked, I then modified the edges to feather them a bit, so that it didn't leave a nasty sharp edge. I had to do a little minor tweaking to make it fit the new frame exactly (ALT + drag a handle expands equally on all sides from the centre; CTRL + drag moves a single corner or side).
So now, my completely focused image (well apart from the frame itself - but I can get away with that, as it is the faces in the photo that are important) comprises of two layers - the original image (background), and the pasted photo on top of it (layer 1). The next thing was to merge them both into a single layer again (select Layer 1, right click, and Merge Down). This puts everything back into the background layer again - but notice the little padlock symbol? You can't make changes to background, so you either need to change background into a real layer (Right click on it and 'Make Layer from Background'), or create a duplicate layer (Right click and 'Duplicate Layer')
Now I wanted to make everything except the rose into monochrome. There are several ways to tackle this, such as using the Quick Selection, or Magic Wand to select everything you want to change; select everything you DON'T want to change, and then 'invert' the selection; use the mask tool (click Q to get to Quick Mask mode) to paint over everything you want to protect...
The method I chose was to zoom in on the rose, and use the Magnetic Lasso to trace around its outline. This tool tries to follow edges or changes in contrast, but can get confused if there isn't enough contrast. If you find it putting new points where you don't want them, just hit the backspace key a few times, and it erases the last few points entered. Watch the cursor carefully when you get almost back to your starting point, and you will see the little plus sign change to a circle - this means it can recognise the start point and if you click now, it will close the loop.
So, having selected the rose, the next thing was to invert the selection as I wanted to select everything EXCEPT the rose. To invert the selection, press Shift + CTRL + I (the marquee around your selection won't change, BUT you'll see an extra marquee appear around the edge of the whole image). Now, anything I do will affect everything but the rose.
 There's a few ways to get the monochrome effect - all of them in the Image | Adjustments section of the menu...
- Desaturate instantly drains all the colour from the selected part of the image
- Black and White does the same, but then allows you to play with 'colour' levels - the effect is to change the contrast of the black and white image as though it were taken through different coloured filters - you'll have to play with it yourself - it's a bit difficult to appreciate unless you have used coloured filters for black and white film photography (which most people these days haven't...)
- Hue/Saturation - this gives slider controls so you can gradually drain the colour, strengthen the colour, or change the brightness - all this can be applied equally to the picture ('master' channel), or individually to Red, Green, or Blue channels)
Personally - initially, I just desaturated it - and got the example above, but then I played with the Hue & Saturation levels to leave a hint of colour - you can see from the original that the frame was a lovely golden colour in the candlelight, and the stones around the candles were bright blue, but all those colours were a bit too strong. Anyway, here is the finished article - I hope you like it.
Footnote - I did not take the original portrait, and it would be lax of me not to acknowledge the original photographer, though I don't know who that is. It's not really the 'done thing' to make changes to somebody else's photo - though technically - this is my own photo, that happens to include somebody else's photo in it... so I think I'm covered.

Thanks again for all your comments on my 30 days 1 thing project! I was always so excited to get them. In day 25, there were no mirrors, or time machines. :-D I took the picture with my camera, and the camera in the picture is my mom's. I'll let you know if I do something like this again.
ReplyDelete